
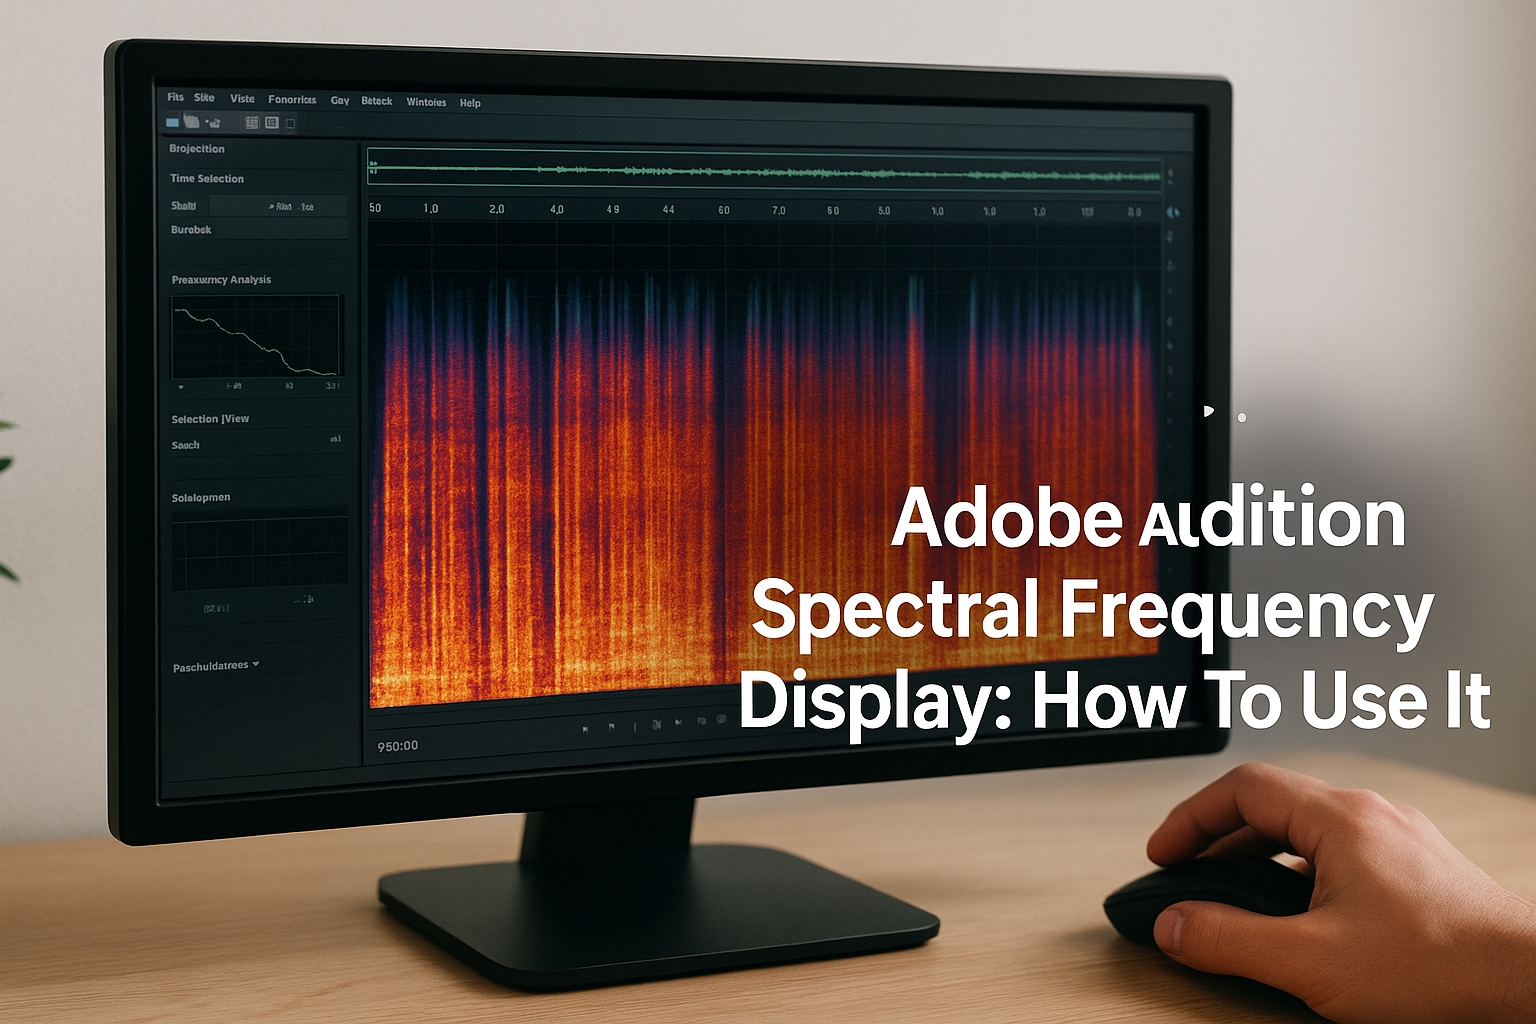
Anyone who’s spent hours reviewing EVP recordings knows the frustration: you capture something that sounds promising, but it’s buried under hiss, hum, or a random beep from nearby equipment. That’s exactly where the Adobe Audition spectral frequency display becomes one of the most useful tools in your audio analysis workflow. Instead of guessing which frequencies contain noise versus potential evidence, you can actually see the sound laid out in color-coded detail.
The spectral frequency display lets you visually isolate and surgically remove unwanted noise from your recordings, without destroying the audio you’re trying to preserve. For paranormal investigators cleaning up field recordings captured with EVP recorders and other gear, this feature is a game-changer. Here at Haunt Gears, we talk a lot about the hardware side of investigations, but post-investigation audio analysis matters just as much as the equipment you bring into the field.
This guide walks you through how the spectral frequency display works, how to access it in Adobe Audition, and how to use it step by step to clean up your audio tracks.
What the spectral frequency display shows
The adobe audition spectral frequency display visualizes your audio as a two-dimensional map, where time runs left to right along the horizontal axis and frequency runs bottom to top along the vertical axis. Color intensity indicates amplitude: bright yellows and whites represent loud elements, while darker blues and purples represent quieter ones. At a glance, you can scan an entire recording and spot problem sounds by their visual signature rather than hunting for them by ear alone.
The color-coded frequency map
Each color in the display corresponds to a specific volume level at a given frequency at a given moment in time. Persistent horizontal bands signal steady background noise like room hum or electrical interference. Short vertical streaks indicate transient sounds like clicks or pops. Here are the most common shapes you will encounter:
| Shape in the display | What it likely means |
|---|---|
| Horizontal band across full width | Constant background noise, such as HVAC hum |
| Short vertical spike | A transient click or pop |
| Bright isolated blob | A beep or tone at a specific frequency |
| Diffuse haze in the upper range | Broadband hiss |
Once you learn these shapes, you can navigate directly to the problem instead of scrubbing through a waveform blindly.
How it differs from the waveform view
The standard waveform view shows you overall amplitude over time, but it tells you nothing about which frequencies are causing problems. The spectral display provides that missing dimension. A 60Hz electrical hum might barely register as a bump in the waveform, yet it appears as a clear horizontal band near the bottom of the spectral view.
Your field recordings typically contain multiple overlapping problems, and the waveform view forces you to address them without clear visual targets. The spectral display stacks all of that information into one view, so you can plan your entire cleanup pass before making a single edit.
Step 1. Set up the spectral view and key settings
Opening the adobe audition spectral frequency display takes only a few clicks, but the settings you configure first determine how much usable detail the view gives you. Skipping this setup step usually means going back to redo your entire cleanup pass, so take two minutes to get the display tuned before you touch anything else.
Opening the spectral display
Open your file in the Waveform Editor, not the Multitrack view. The Multitrack view does not support the precision selection tools you will need later. Use these steps to activate the spectral panel:
- Go to View > Show Spectral Frequency Display
- Or press Shift+D to toggle it on immediately
- The spectral panel appears below your waveform, giving you both views simultaneously
Adjusting the key settings
Right-click inside the spectral display and select Spectral Display Settings to control how the view renders. These three settings matter most for EVP and field recording cleanup:

- FFT Size: Set to 4096 for a solid balance between frequency resolution and time resolution
- Window: Use Hann as your default window function for general audio work
- Decibel Range: Set to -120 dB to reveal quiet anomalies that a narrower range would hide entirely
A higher FFT size sharpens frequency bands but blurs the timing of transient sounds, so 4096 hits the right balance for most paranormal recordings.
Step 2. Find problem sounds by their shapes
Before you select or delete anything, scan the entire spectral frequency display from left to right and note where unusual patterns appear. Your goal at this stage is identification only. Rushing to edit before you understand what you’re looking at leads to removing audio you actually want to keep.
Reading the visual patterns
The adobe audition spectral frequency display makes pattern recognition straightforward once you know what to look for. Each type of noise leaves a distinct visual signature that you can learn to spot in seconds.
| Pattern | Frequency location | What it is |
|---|---|---|
| Thin horizontal line | Low range (50-120 Hz) | Electrical hum |
| Bright isolated dot or blob | Any frequency | Beep or tone |
| Vertical smear | Across all frequencies | Click or impact |
| Faint haze across upper range | Above 4,000 Hz | Broadband hiss |
Scanning the low frequency range first saves time because electrical interference almost always shows up there before anywhere else.
Where to look first
Start at the bottom quarter of the display, where hum and interference from power sources and recording equipment tend to concentrate. Then move your attention upward to the upper half of the display, where hiss and high-frequency noise clusters. Work systematically from bottom to top so you don’t miss anything buried in the mid-range.
Step 3. Remove beeps, rings, clicks, and whine
Once you’ve identified the visual signatures in the adobe audition spectral frequency display, you’re ready to target and remove specific problem sounds without touching the audio around them. Adobe Audition gives you precision selection tools designed for exactly this kind of surgical edit.
Selecting and deleting tones and beeps
Use the Marquee Selection tool (press M) to draw a box directly around isolated blobs or horizontal bands in the spectral view. For a beep or ring, drag your rectangle to cover the bright area plus a small buffer on each side, then press Delete to silence only that selection.

Keep your selection tight around the anomaly rather than dragging across large sections of frequency range, or you risk pulling out audio you want to keep.
Follow these steps for any isolated tone:
- Press M to activate the Marquee Selection tool
- Draw a rectangle around the bright blob or band
- Press Delete to remove only that frequency region
- Press Ctrl+Z immediately if the result sounds hollow or unnatural
Removing clicks and whine
Clicks appear as short vertical streaks cutting across all frequencies. Switch to the Lasso Selection tool (L key) and draw a freehand outline around the streak for a precise fit. For high-frequency whine, which shows as a thin angled or horizontal line in the upper range, draw a tight rectangular selection along its length and delete it the same way.
Step 4. Reduce hiss and room noise safely
Broadband hiss and room noise require a different approach than isolated tones. The adobe audition spectral frequency display shows the haze-like spread of these sounds across the upper frequency range, but deleting them directly leaves audible gaps and hollow patches throughout your recording. Instead, use Adobe Audition’s built-in Noise Reduction tool to target and reduce them cleanly.
Capturing a noise print
Find a short silent section of your recording where only background noise is present, with no voice or audio you want to keep. Select that region in the spectral view, then go to Effects > Noise Reduction / Restoration > Noise Reduction (process) and click "Capture Noise Print."
Capturing from a 0.5 to 1-second section gives the algorithm enough data to identify the noise pattern accurately without over-sampling.
Applying the reduction
With the noise print captured, select your full recording and open the Noise Reduction dialog again. Use these settings as a starting point:
- Noise Reduction: 60-70%
- Reduce by: 10-15 dB
- Smoothing: 1
Click Apply and re-check the spectral display to confirm the haze has cleared. If the result sounds thin or robotic, undo and lower the Noise Reduction percentage by 10% and try again.

Ready to clean up your next recording
The adobe audition spectral frequency display gives you a clear visual map of everything in your recording, which means you stop guessing and start making precise, intentional edits. By identifying noise shapes, selecting them with the right tools, and applying noise reduction only where it’s needed, you protect the audio that matters while stripping out the interference that doesn’t.
Your workflow from here is straightforward: open the spectral view, scan from bottom to top, isolate problem sounds by shape, remove tones and clicks with the Marquee or Lasso tool, and apply a noise print capture for any broadband hiss. Each step builds on the last, so running through them in order keeps your edits clean and reversible.
Better audio analysis starts with better field equipment. Check out the paranormal investigation gear at Haunt Gears to find tools built for capturing reliable recordings worth cleaning up.
Discover more from Haunt Gears
Subscribe to get the latest posts sent to your email.
Leave a Reply
Your email is safe with us.