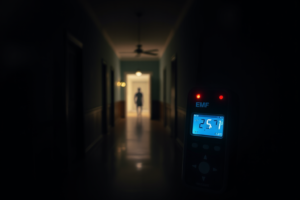
Owning a Fluke thermal camera is one thing, knowing how to use it properly is something else entirely. Whether you’re scanning walls for cold spots during a paranormal investigation or documenting thermal anomalies for a client report, Fluke thermal imaging camera training gives you the technical foundation to trust what you’re seeing on screen. Without it, you’re essentially guessing at what those color gradients actually mean, and that’s a fast way to miss real evidence or misinterpret normal heat signatures.
At Haunt Gears, we sell and review thermal imaging equipment built for serious investigators. But we’ve learned that the gear is only as good as the person behind it. That’s why understanding formal training paths, especially Level 1 and Level 2 thermography certifications, matters so much, even in the paranormal field. Certified operators catch details that untrained eyes skip right over.
This guide breaks down the courses, certification levels, and self-study resources available for Fluke thermal cameras. You’ll learn what each training path covers, how long it takes, what it costs, and which option fits your experience level, whether you just unboxed your first imager or you’ve been running investigations for years.
What Fluke training covers and who needs it
Fluke thermal imaging camera training is not just a product tutorial. It teaches you the physics of heat transfer, how to interpret emissivity settings, and how to document findings in a way that holds up to scrutiny. You also learn how to avoid common misreadings, such as confusing reflected thermal energy with an actual temperature anomaly, which is one of the most frequent mistakes investigators make in the field.
Core curriculum: what the courses teach
Most accredited thermography courses built around Fluke equipment follow a structured curriculum tied to international standards, specifically ISO 18436-7, which governs condition monitoring and diagnostics through infrared thermography. Here is what a typical training program covers at each stage:

- Thermal theory: radiation, conduction, convection, and how each affects your readings
- Camera operation: focus, thermal span, level controls, and image capture settings on Fluke imagers
- Emissivity and reflectivity: how surface material affects temperature accuracy
- Image analysis: how to identify hot spots, cold spots, and gradients in a captured image
- Report writing: how to document findings with annotated images and supporting data
Knowing the theory behind the reading is what separates a reliable investigator from someone just pointing a camera at a wall.
Who should take formal training
Paranormal investigators benefit from thermography training because unexplained cold spots and surface temperature variations are central to many investigations. Without a baseline understanding of how building materials radiate heat, you will misidentify HVAC drafts or window conduction as anomalies.
Facilities managers, home inspectors, and energy auditors also take these courses. You do not need to be in a technical profession to enroll, but the more seriously you take your investigations, the more value you will extract from a certified training path.
Step 1. Pick the right certification level
Before you enroll in any fluke thermal imaging camera training program, you need to know which certification level matches your current skills and goals. Picking too advanced a level wastes money; picking too basic a level leaves gaps that matter when you are out in the field trying to distinguish real anomalies from heat reflections.
Level I: Where most investigators start
Level I thermography certification covers the fundamentals: camera setup, image capture, basic heat transfer theory, and introductory analysis. If you are new to thermal imaging, this is the right entry point, and most Level I courses run between 32 and 40 hours of instruction with no prior thermography background required.
Completing Level I gives you a defensible, documented baseline for every thermal reading you capture on an investigation.
Level II: When you need deeper analysis
Level II certification builds on Level I by adding advanced image interpretation, multi-point analysis, and structured report writing. You typically need at least 2,000 documented hours of field experience with a thermal camera before qualifying to sit for Level II. For investigators running professional or research-grade operations, this level adds measurable credibility to your findings and your documentation.
Step 2. Choose a reputable training provider
Not every thermography course delivers equal value. When you shop for fluke thermal imaging camera training, look for programs accredited by recognized bodies like Infraspection Institute or the American Society for Nondestructive Testing (ASNT). These organizations set curriculum standards that align with ISO 18436-7, so your certification carries weight beyond your immediate investigation group.
Accredited organizations to consider
Two organizations dominate the accredited thermography training space in the US:
- Infraspection Institute: Offers Level I, II, and III programs in both in-person and online formats
- ASNT: Provides certification through employer-based or central certification routes, widely recognized across industrial and research sectors
Both organizations publish their full course requirements publicly, so you can verify exactly what you are signing up for before you pay.
Accreditation tells anyone reviewing your documentation that your readings follow a verifiable, established standard.
What to check before you enroll
Confirm that the program specifies minimum instructional hours (at least 32 for Level I) and includes hands-on or practical components. A recognized certificate upon completion is non-negotiable if you plan to present your findings professionally.
Also verify whether the course covers Fluke-specific camera operation or stays entirely generic. Practical time with your actual equipment closes the gap between classroom theory and real field results, and some providers allow you to submit your own captured footage for instructor review, which adds measurable value to the learning experience.
Step 3. Build hands-on skills with your camera
Classroom knowledge only sticks when you apply it immediately. After completing your fluke thermal imaging camera training coursework, you need to run structured practice sessions with your actual Fluke imager before you sit for any exam or take it into the field professionally.
Run controlled practice scenarios
Set up repeatable test environments at home to practice reading thermal output. For example, place a warm object like a mug of hot water against a cold wall, then capture images and adjust your emissivity settings to see how the reading shifts.

Document each session with a written log that includes camera settings used, ambient temperature, and a note on what the image shows. Building this reference library before your exam gives you real examples to draw on when test questions cover image interpretation and emissivity adjustments.
Review your images with a checklist
Use a simple review checklist after each practice session to identify gaps in your technique:
- Camera model and firmware version
- Emissivity value used
- Ambient temperature at time of capture
- Identified anomaly and probable cause
- Comparison image (baseline vs. anomaly)
Reviewing captured images against a standard checklist trains your eye to spot inconsistencies quickly and documents your field hours toward Level II eligibility.
Step 4. Prepare for the exam and recertify
Passing your thermography exam requires targeted preparation, not just reviewing course notes the night before. Most Level I exams test thermal theory, image interpretation, and camera operation in a written format, so the structured practice logs you built in Step 3 become your most valuable study resource at this point.
Know the exam format
Most accredited thermography exams include multiple-choice questions covering heat transfer theory, emissivity application, and image analysis. Review your course materials section by section, and use your annotated practice images as concrete study examples for the interpretation questions.
- Review thermal theory: radiation, conduction, and convection
- Practice identifying emissivity-driven misreadings in your captured images
- Reread your report templates and confirm you know every required documentation field
Treating your practice logs as a personal study bank gives you real-world examples that textbook questions alone cannot replicate.
Stay current with recertification
Level I and Level II thermography certifications typically expire after three years. To recertify, you need documented field hours and continuing education credits, which is exactly why logging every investigation session matters from day one of your fluke thermal imaging camera training. Start that log now, and recertification becomes a straightforward process rather than a scramble.

Next steps
You now have a clear path through fluke thermal imaging camera training: pick the right certification level, enroll with an accredited provider, build your practice session log, and stay on top of recertification requirements. The training pays off quickly once you start distinguishing real thermal anomalies from environmental noise in the field, whether you are running a full investigation or a targeted site scan.
Start with your Level I coursework as soon as possible, because your documented field hours begin counting from your very first logged session. Every investigation you complete before your exam builds directly toward both your certification and your eventual Level II eligibility.
Getting certified also means having the right equipment to back up your skills. Browse our paranormal investigation equipment to find Fluke-compatible thermal imaging cameras and the supporting tools that experienced investigators rely on for professional-grade, credible fieldwork.